Here are some basic tips for keeping your Sweeper in top condition.
Use a foam pre-filter to prevent the trash from clogging the sweeper intake.
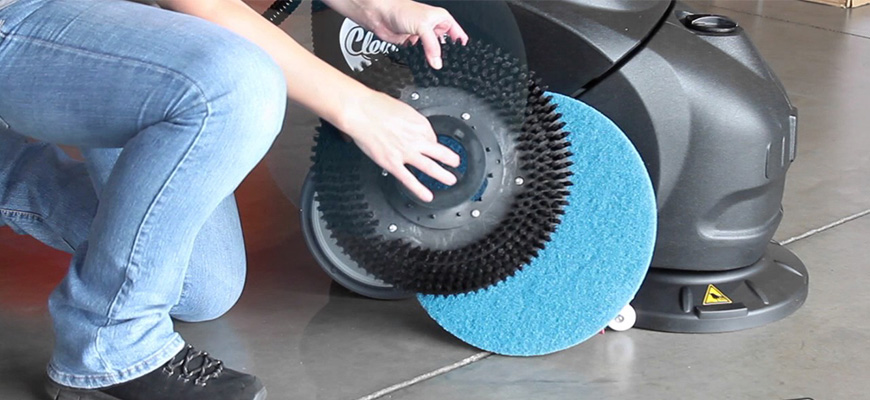
Keep your brush head clean. Silt buildup can give poor catch performance.
Wash the brush heads once every other day, but don't use pressure washers on any part of the drive system.
Regularly check and maintain the intake strainer for proper operation and prevent excess wear on the brush bar.
Often, more maintenance can be done by simply checking your screens for damage or foreign objects. Clean them as needed.
If you find that your sieve is damaged and requires replacement, please contact your local distributor of Accurate Truck & Equipment products for assistance.
Sweeper Maintenance
Cleaning tips for Sweeper
How do you clean a commercial sweeper? The following steps are used to clean a commercial sweeper:
Before you're able to start cleaning your Sweeper, you need to make sure there are no obstructions in its path. You do this by parking the Sweeper next to an obstruction like a waste receptacle or tree box and checking to make sure they are clear. Once everything is good to go, park your Sweeper perpendicular to the Sweeper's path. This way, you will have enough room between the Sweeper and whatever it is moving forward to on its path.
Turn off your Sweeper before you start cleaning it. This way, there won't be any suction power left over in the machine that might prevent you from getting inside it later on. Some sweeper models like this have a lock button that needs to be pressed down for three seconds before turning all of their functions off completely. Once everything is turned off, use a screwdriver or wrench to unlock the sweeter's front panel.
Once the sweeper's front panel has been unlocked, pull firmly upward on the Sweeper's Sweeper to remove it. This Sweeper has a sweeper sweeper sweeper sweeper sweeper sweeper sweeper attached to the machine, so the panel should pop off easily. Do this step gently if you have an older version of the sweeter model, as they sometimes require more force than newer models do to take off.
The next thing you need to do is unplug your Sweeper from its electric outlet using a screwdriver or wrench. Once you've done that, detach all of the connectors plugged into any part of your sweeter's electric system by hand. There will be two connectors on most commercial sweepers: one for the brush and one for the hose.
Once everything is disconnected, you can start taking apart sweeper sweeper sweeper sweeper sweeper sweeper sweeper sweeper sweeper sweeper. Start with the brush deck and detach it from your sweeter's body by using a screwdriver or wrench to unscrew each bolt holding it into place. At this point, you should be able to take off your Sweeper's brush deck for easy cleaning.
Once the brush deck is removed, you need to remove all your Sweeper's brushes. Depending on how much dirt gets caught up in them, this step might happen before the last one; if so, skip over to the next section, where we discuss cleaning brushes. If not, continue reading to know how to take the Sweeper out.
Four screws are holding your Sweeper up, so undo those and remove them and your sweeper drive belt. Once you've done that, lift on the brushes, and they will easily come out of the machine. Make sure you put aside any parts that fall off so you can reassemble everything before reusing it again.
Once all of your brushes have been taken care of, it is time to clean them off. You'll need either a bucket or sink for this part, depending on which method works best for cleaning your Sweeper. If you're using a sink, put some warm water in it and soak your brushes for five minutes. After that time is up, use your hand to brush all of the dirt stains away from your Sweeper, so there are no particles left on them at all. Once you've done this step, set the clean brushes aside to dry off for at least one hour before reattaching them back into their original position on your machine.
If you would rather dunk your brushes into a bucket instead, follow the same procedure of soaking the bristles for 5 minutes and then brushing them clean. Once you've done that, lay your Sweeper out flat on a countertop and use a cloth to dry it off as much as you can.
You'll want to put your Sweeper into its front panel again first. You don't have to attach the other parts back onto it just yet, but if you have any additional parts from other areas of your machine, those should be cleaned before being reattached. To do this step, slide the part back into the appropriate place on the machine's body and screw or bolt it back in securely so that there is no risk of it falling out or being loose.
You should now have a sweeper free of dirt stains to plug back into the electric outlet to see if it still works properly. Once your Sweeper works as expected, but all the other pieces back onto the body of your machine, and then wipe down any areas on your Sweeper that got dirty during this process to remove any excess moisture.
The final step in cleaning a commercial sweeper is to take all parts off again, dunk them in water, and let them dry before putting them back together for future use.
Why choose Lift Part Warehouse to buy Clarke Sweeper Parts?
We have a very close relationship with the manufacturers of all OEM replacement parts and can source almost any part you require at a very reasonable price. We always provide genuine aftermarket spares for Clarke sweepers manufactured using up-to-date technology and materials.
Takeaways
Sweepers are used in helping clean up larger debris items on the roads.
Turn off your Sweeper before you start cleaning it.
Once the brush deck is removed, you need to remove all your Sweeper's brushes.
Regularly check and maintain the intake strainer for proper operation and prevent excess wear on the brush bar.