524267634 Yale Standard AC Display
Product Description
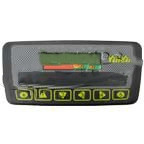
The 524267634 Yale standard AC display is a digital device that shows your electric vehicle's speed, battery level, error codes, and other important data. It also lets you adjust the settings of your vehicle, such as acceleration, braking, and steering. The display has a clear and bright LCD screen visible in any lighting condition. It is connected to the controller and the motor through a cable included in the package. The display has a simple and intuitive interface that is easy to use and understand.
CROSS-REFERENCE:
CL7007094, DM83Y26039A, HU1706500, PHAX00000665, YP5243364-98, YT524267634, 7007094, 83Y26039A, 1706500, AX00000665, 5243364-98, 524267634.
524267634 Yale standard AC display
Product Specifications
The 524267634 Yale standard AC display has the following specifications:
Condition | Remanufactured OEM |
Brand | Yale |
Part Type | Standard AC Display |
Manufacturer Part Number | 524267634 |
Compatible Equipment Type | Electric Vehicle |
Features and Benefits
The 524267634 Yale standard AC display has many features and benefits that make it a great choice for your electric vehicle. Some of them are:
High-quality
The display is made of durable and reliable materials that can withstand harsh conditions and frequent use. It has a sturdy and waterproof casing that protects it from dust, moisture, and impact. It also has a long-lasting battery that can last for up to a year without replacement.
Compatible
It is compatible with most electric vehicles that use Yale controllers and motors. It can also work with other brands and models with similar specifications and connectors. It can easily fit in any dashboard or console of your vehicle.
Easy to install
It is easy to install and requires no special tools or skills. You just need to connect the cable to the controller and the motor, mount the display in your preferred location, and turn on the power. The display will automatically detect and calibrate the settings of your vehicle.
Easy to use
It has a simple and intuitive interface that is easy to use and understand. You can navigate through the menus and options using the four buttons on the front panel. You can also adjust the settings of your vehicle using the up and down buttons. The display will show you the current status and data of your vehicle on the screen.
Clear and bright
It has a clear and bright LCD screen visible in any lighting condition. The screen has a high resolution and contrast that makes the text and graphics easy to read. The screen also has an LED backlight that illuminates the screen in low-light situations.
Applications
The 524267634 Yale standard AC display can be used for various electric vehicle applications.

Electric Vehicle
Warranty Information
The 524267634 Yale standard AC display comes with a 6-month warranty, upgradable for up to 36 months. All remanufactured and rebuilt items are subject to a core charge. The core charge is refundable. The refund amount will be determined by the status of the core returned.
Not Sure Will This Part Fits Your Equipment?
If you are not sure whether this part will fit your equipment or not, you can contact us through our channels, and we will be happy to assist you. You can reach us by phone at 1.800.210.8170, by email at [email protected], by filling out our contact form at https://www.liftpartswarehouse.com/articles.asp?id=83, or by using our live chat feature on our website. Our customer service representatives are available from Monday to Friday from 9 am to 8 pm EST.
Frequently Asked Questions & Answers
Q: How do I install the display on my vehicle?
A: To install the display on your vehicle, you need to follow these steps:
Turn off the power of your vehicle and disconnect the battery.
Locate the controller and the motor of your vehicle and find the connectors for the display cable.
Connect the cable to the controller and the motor, making sure that the pins match the sockets.
Mount the display in your preferred location using the screws and brackets.
Turn on the power of your vehicle and check if the display is working properly.
Q: How do I adjust the settings of my vehicle using the display?
A: To adjust the settings of your vehicle using the display, you need to follow these steps:
Press the enter button to access the main menu of the display.
Use the up and down buttons to scroll through the options and select the one that you want to change.
Press the enter button again to enter the sub-menu of the selected option.
Use the up and down buttons to increase or decrease the value of the selected option.
Press the enter button again to confirm your changes and exit the sub-menu.
Press the exit button to return to the main menu or exit the display.
Q: How do I reset the display to its factory settings?
A: To reset the display to its factory settings, you need to follow these steps:
Turn off the power of your vehicle and disconnect the battery.
Press and hold both the enter and exit buttons on the front panel of the display for 10 seconds.
Release both buttons, reconnect the battery, and turn on the power of your vehicle.
The display will show a message that says "Resetting..." and then "Done."
The display will now have its original settings.
Q: How do I replace the battery of the display?
A: To replace the battery of the display, you need to follow these steps:
Turn off the power of your vehicle and disconnect the battery.
Remove the screws and brackets that hold the display on your dashboard or console.
Carefully detach the cable from the controller and the motor.
Open the back cover of the display by unscrewing the four screws on the corners.
Remove the old battery from the battery holder and dispose of it properly.
Insert a new CR2032 lithium coin cell battery into the holder, ensuring the positive side is facing up.
Close the back cover of the display and secure it with the four screws.
Reconnect the cable to the controller and the motor, ensuring the pins match the sockets.
Remount the display on your dashboard or console using the screws and brackets.
Turn on the power of your vehicle and check if the display is working properly.
Frequently Bought Together
If you are interested in buying this product, you might also want to check out these other products that are frequently bought together with it:

